ProWalker CPU Beta
Overview: ProWalker CPU Beta, likely will be called something else when it is released, uses Intel's pathtracing engine called Ospray, with built in Denoise AI
- Osprayis a physically-based, progressive pathtracer that simulates the behavior of real-world light and materials to generate photorealistic imagery.
- Path Tracing Due to path tracing accuracy, unbiased nature, path tracing is used to generate reference images when testing the quality of other rendering programs...i.e. SU Podium V2.6 However, the path tracing tends to take a long time to produce a high quality image as a very large number of rays must be traced to get high-quality images free of noise. But that has all changed with the introduction of Denoise AI, which denoises the rendered image quickly so smaller number of rays can be used to get a high quality image.
Work Flow Overview
- Camera/navigation options - Navigation and camera synching between ProWalker and SketchUp works exactly as before.
- SU Podium materials integration - ProWalker still supports and relies on all of SU Podium's material settings (reflection, refraction, transparency, and all Podium light types). If you have not already done so, it is strongly recommended that you install SU Podium to make the most of ProWalker's ability to render materials realistically.
ProWaler CPU UI/Workflow:
The lighting dialog, render preferences, export settings, render modes, and general UI have all been modified to accommodate the new path tracing rendering workflow.

Above is the new UI for ProWalker CPU. For now, we can ignore the "Presets" dialog and camera navigation icons, as they work exactly the same as before. If you are new to Podium Walker, please read here for an overview of camera navigation and here for camera animation.
The preview image continuously updates as path tracer progressively refines the image. The number of samples that have been completed is shown in the bottom left. ProWalker CPU Beta runs continuously until you stop it manually, or until a frame reaches the maximum time/sample count set in the render settings dialog. Making a change to the model or moving the camera will reset the sample count to 1 and restart the process.
1. Render settings Gear icon
Iray is a "progressive pathtracer," so the render quality of an animation depends on the number of samples/iterations that Podium Walker is allowed to perform per frame.
PW_CPU renders are noisey at low-sample levels; as samples are added the render engine progressively refines the image, eliminating noise and artifacts with every new iteration. So a frame with 100 samples is going to be noisier/less refined than a frame with 500 samples.

Podium Walker gives you three ways to set the image quality, shown in the image opposite.
- Time: Sets a maximum time limit per frame. When that limit is reached, Podium Walker moves to the next frame whether or not all noise has been resolved.
- Samples: Sets a maximum number of samples per frame. Use this if you've done test renders and know how many samples are required for your desired image quality. This is the most common method to use. The path tracer continuously samples pixels of an image. If you prefer extreme high quality, increase the samples although in most cases 20 samples is sufficient.
- Automatic: An automatic solution that attempts to find an efficient balance between speed and quality. Move the slider to the right for higher quality but slower rendering.
2. Background settings dialog ![]() Cloud icon
Cloud icon
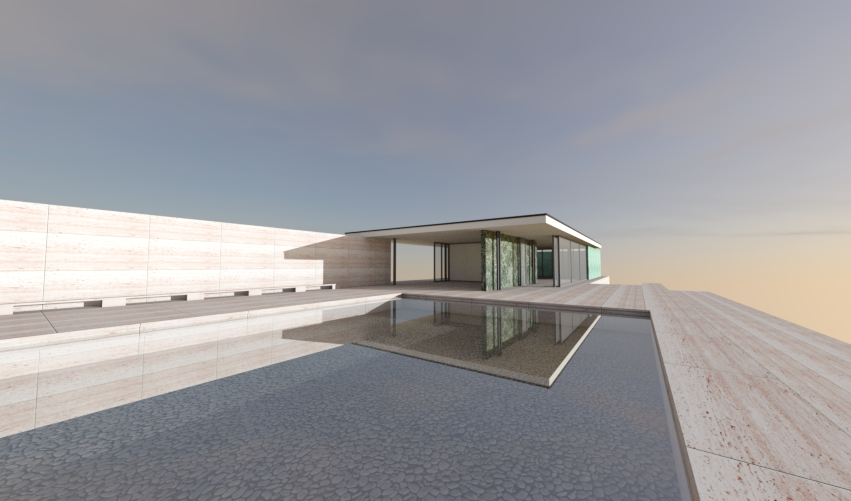
PW_CPU has an updated selection of background settings, including five sky simulations for exterior rendering, and 8 HDR background textures including two additional exteriors, and six HDR light studios for image based rendering. These examples show four of the five simulated sky options:
Clear Sky
Cloudy 1
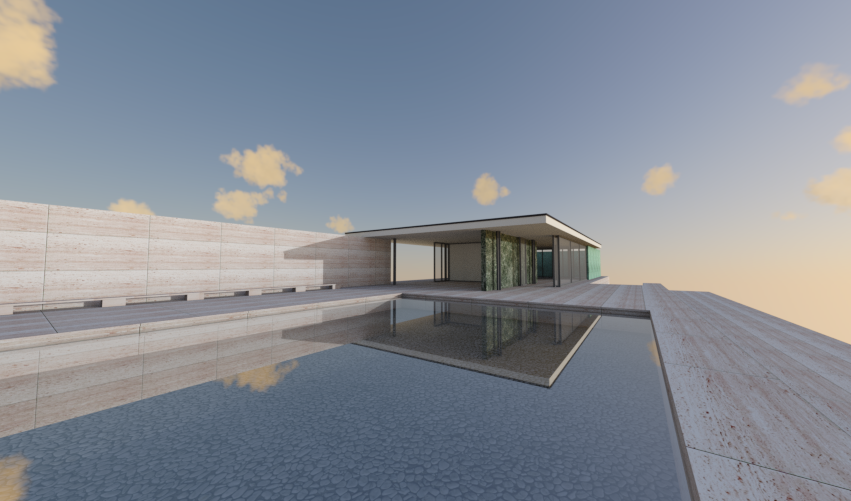
Fine 1
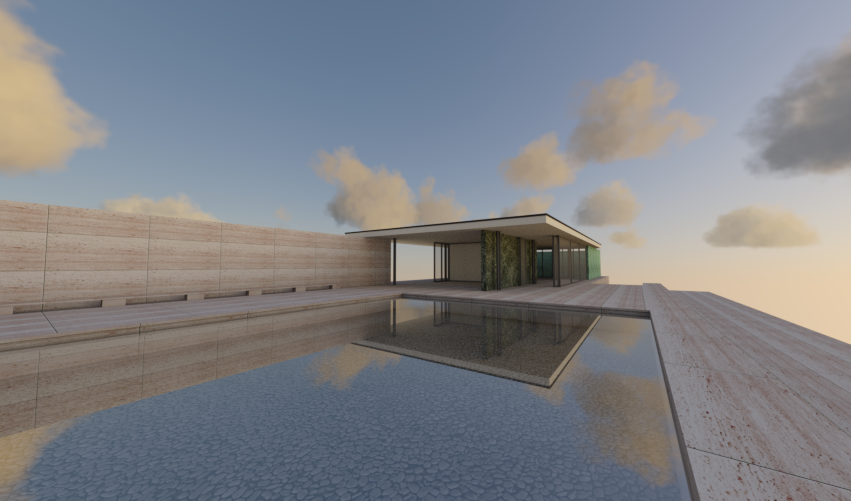
Fine 2
Click the "HDRI" radio box in the background dialog to use one of the 8 HDR backgrounds instead of the sky simulations.
HDR Studio 11

Sunset (Photoreal mode)
Ext 001
Sunset (Id Mode)
3. Lighting Dialog
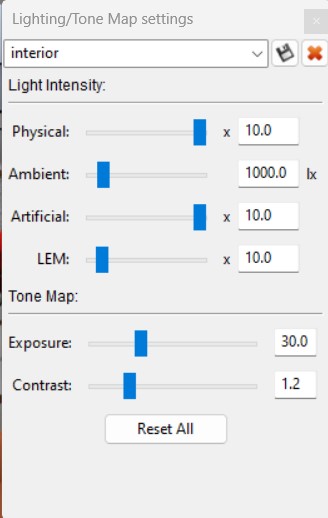
The ProWalker CPU lighting dialog controls the strength/brightness of the physical sky, artificial lighting, ambient light, and light emitting materials. You will need to use this frequently, especially if you are using the presets in SU Podium V2.6. But changes made are in real time.
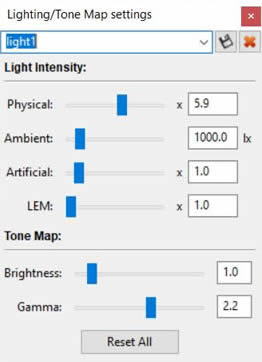
There are also tonemapping controls to make global lighting adjustments via the brightness and gamma sliders.
Physical, Artificial, and LEM
- Physical determines the brightness of the physical sun/sky system AND also controls the brightness when using image based HDRI lighting when the "texture" radio button is checked in the backgrounds dialog.
- Artificial a global brightness modifier for all artificial Podium lights in the scene, including omni lights and point lights. Changes to the individual brightness of artificial lights must be made in the SketchUp scene.
- LEM a global brightness multiplier for all light emitting materials in the scene.
Brightness, Exposure
- Contrast- This is an illumination adjustment applied linearly to all pixels in your image to lighten or darken the render. Generally, we recommend you use the "physical" slider to get your illumination as close as possible to the desired result before touching the brightness slider.
- Exposure - In ProWalker, the exposure slider works similarly to a contrast adjustment in Podium Image Editor. Lowering the Gamma value will appear to increase contract, darkening shadows and brightening highlights. Increasing the gamma slider beyond 2.2 has the opposite effect, compressing the value range and decreasing contrast.
Like materials, ProWalker CPU Beta does not have its own interface for creating artificial lights yet. The user must therefore use the SU Podium lighting dialog for this purpose.
Saving Lighting/ Tone mapping settings (this currently only works in Windows Beta)
- None of the light/ tone mapping settings are saved. They are lost as soon as you close ProWalker. However, you can save customized settings if you create a name for the customized settings and then use the disk icon to save the name.
- Create a name in the blank field close to the top of the Lighting/ Tone mapping setting dialog box. Then select the disk icon. This will save the lighting settings as a name. Make sure you save the .skp file. When you re-open the same .skp file, the customize settings can be opened by opening the name.
- Unfortunately, this feature does not exist yet in the ProWalker CPU Beta Mac version, yet.
4. Capture an image (Exporting a still render) ![]() Camera icon
Camera icon
The image you see in the ProWalker viewport is a preview image meant to assist as you fine-tune lighting, composition, and samples/render mode. Use the camera icon to export a still render, as demonstrated in the one minute video below
Note - The above video is using ProWalker GPU but it's almost the same as PW_CPU. Ignore the render modes.